As everyone, I hate advertisment.
I know most of the webservices are relying on it to get some revenue, however I don’t like how intrusive it can get and how it defaces most websites when there’s too much of it.
So when I learned that Android 9 was bringing a so-called “Private DNS” that basically allowed one to configure their own global DNS server served over TLS using the DoT protocol, I immediately thought of running my own DNS server serving PiHoled DNS responses over TLS to get rid of advertisment. Sadly PiHole isn’t serving DNS over TLS (yet?), so I had to struggle a bit in order to get a working solution. But I did, and will explain you my journey towards an ad-free Android below.
Furthermore this solution works on both Wifi and LTE networks, without the need for any active VPN system, and it is entirely controlled by a single option. Notice it requires an Android 9+ device, which are fairy common nowadays, since Android 9 was released over 3 years ago.
And it also doesn’t require a rooted device, so it works on full stock, non-rooted devices. (I used to run a rooted phone just to be able to set my own /etc/hosts file back in my college years, so I really had this one coming.)
First attempt: PiHole & Unbound
Sadly, my intuition that using PiHole would be easy wasn’t true… While it is fairly easy to run PiHole and it is also easy to get it to query DoT servers, it is not that easy to come up with a setup where it would serve sinkholed DNS over TLS using DoT. I could find some obscure comments on Reddit, but nothing that truly helped me.
Also, it wouldn’t be fun if I didn’t decide to add an extra layer of indirection and tried to do all of this using Docker containers and docker-compose (and that despite the fierce recommendations of one of my friends to go with LXC containers instead. But I’m lazy, I guess: Docker seemed easier, coming with nice pre-made images and all. I’m alright with Vim’s learning curve, granted, but since I’m no sysadmin or cloud person, I went with the easiest way I could find.)
My first attempt was to rely on Pi-Hole to do the ad-blocking, as it works well on a local network, and since PiHole couldn’t serve DoT, I used unbound as a DoT server.
In case you’re wondering what it was like, here’s a snippet of my docker-compose file:
version: '2.4'

services:
	pihole:
		image: pihole/pihole:latest
		restart: unless-stopped
		expose:
			- 80
			- 443
		ports:
			- '8081:8081/tcp'
		environment:
			- "VIRTUAL_HOST=youramazing.url"
			- "VIRTUAL_PORT=80"
			- "WEB_PORT=8081"
			- "WEBPASSWORD=youramazingpassword"
			- "PROXY_LOCATION=pihole"
		dns:
			- 127.0.0.1
			- 1.1.1.1
			- 1.0.0.1
		volumes:
			- pih:/etc/pihole/
			- dnsmasq:/etc/dnsmasq.d/
		depends_on:
			- nginx-proxy
			- nginx-proxy-letsencrypt
		networks:
			mydns:
				ipv4_address: 10.123.123.3

	unbound-toh:
		image: mvance/unbound:latest
		restart: unless-stopped
		ports:
			- 853:853
		volumes:
			- /home/user/unbound:/opt/unbound/etc/unbound/
			- /home/user/unbound/certs:/etc/unbound/certs/
		depends_on:
			- pihole
		healthcheck:
			disable: true
		networks:
			mydns:
				ipv4_address: 10.123.123.4

volumes:
	pih:
	dnsmasq:

networks:
	mydns:
		ipam:
			driver: default
			config:
				- subnet: 10.123.123.0/24
I’m not showing you the nginx-proxy and nginx-proxy-letsencrypt details, as these have nothing fancy in my setup. In any case I wouldn’t advice you to try and run the above, since it wasn’t working reliably in my experience. If you want to skip the technicalities you can go below to read about my second, more sucessful, attempt.
As you can guess, this required me to copy the certificates from Letsencrypt from /etc/letsencrypt/live/youramazing.url/ to /home/user/unbound/certs/. I could have tried to bind my volume directly to /etc/letsencrypt/live/youramazing.url/ on my host, but that didn’t feel right.
Notice how the PiHole container needs to expose both port 80 and 443 in order to be able to effectively sinkhole ads. This is somewhat handled by my nginx-proxy, so I didn’t need to expose the ports on the host explicitely here.
It is nice too because PiHole comes with an official docker image.
Sadly this setup would die on me randomly, making me create strange cron jobs to try and reboot it in case it was in standstill.
It wasn’t really as stable as I’d liked and it was also quite tedious to get it to work with Letsencrypt certificates and required custom docker networks with fixed IPs because unbound wasn’t able to resolve a named container in its config files. I also had to override the default unbound config file with my own, in order to be able to enable the DoT. I took the default unbound.conf file from my docker image, and changed the following:
...
    interface: 0.0.0.0@853
## My DoT customizations
    tls-service-key: "/etc/unbound/certs/privkey.pem"
    tls-service-pem: "/etc/unbound/certs/fullchain.pem"
    tls-port: 853
    incoming-num-tcp: 1000
    do-udp: no
    udp-upstream-without-downstream: yes
## End customizations

    # Rotates RRSet order in response (the pseudo-random number is taken from
    # the query ID, for speed and thread safety).
    rrset-roundrobin: yes
    # Drop user  privileges after  binding the port.
    username: "_unbound"
...
## at the very end
    ###########################################################################
    # LOCAL ZONE
    ###########################################################################
    # Include file for local-data and local-data-ptr
## Commenting the default files
    #include: /opt/unbound/etc/unbound/a-records.conf
    #include: /opt/unbound/etc/unbound/srv-records.conf

## Adding my pihole
forward-zone:
        name: "."
        forward-addr: 10.123.123.3@53
I also had to set the healthcheck: disable: true option on my unbound docker image because otherwise it would sometimes go into a degraded state without any reason.
Sadly, this wasn’t really stable, getting often stuck in some degraded state, and I was having quite a few issue with the dedicated container IPs which would sometime complain about overlapping network ips upon docker-compose up -d thus making the automation of the update of my containers prone to failure.
And then I was battling with the config files, and the certificates’ renewal, etc.
Also I couldn’t find a way to properly delegate the handling of the Letsencrypt certificate to Nginx-proxy’s letsencrypt companion image, since I needed the TLS on a custom port (853, for DoT) and didn’t need it for HTTPS. I couldn’t find a way to properly bind it to my docker container without having to expose all the ports and that was pretty annoying too.
I plan to try and get back to this one day, probably removing the nginx-proxy and directly exposing the ports, altough I would have preferred to have a reverse proxy in front. Maybe I’ll finally dig into Traefik. I should also probably move away from unbound to try something like Knot resolver instead since it also supports DoT.
Second attempt: Technitium DNS server
So, when I discovered that the Technitium DNS Server was supporting both ad-blocking and serving DoT requests, I was very interested, as you can guess! A quick study of that solution revealed it was written in C#, came with a nice web-based interface, had IPv6 support, did caching, was able to connect to public DNS resolvers using both DoT and DoH, thus preventing your ISP to see any of your DNS traffic, and was fairly easy to setup.
So, I decided to change and it really simplified my setup, since now my docker-compose file could look almost exactly like the example from the docker image I decided to use:
version: '2.4'

services:
	dns_server:
		image: m400/technitium
		networks:
			technitium-network:
				aliases:
					- technitium-dns
		ports:
			- 853:853
			- 5380:5380
			- 53443:53443
		environment:
			- TZ=Europe/Zurich
		volumes:
			- dns-data:/app/config
			- /home/user/dns/ssl:/etc/ssl
			- /home/user/dns/logs:/app/config/logs
		restart: unless-stopped

volumes:
  dns-data:

networks:
  technitium-network:
Next I had to ensure I wouldn’t run into the same problems as previously. But my problem with the renewal of Letsencrypt certificates could be solved by using certbot directly on my docker host device instead of trying to rely on the , altough Technitium didn’t make it easy because it requires a conversion from OpenSSL format to to PKCS#12 for it to use the certificate… But Technitium is aware of the problem and discussed its solution in a post last year.
So, it appears that certbot allows for “renewal-hooks”, which are basically scripts triggered upon renewal of a certificate.
We can thus simply create a script handling the conversion automagically in /etc/letsencrypt/renewal-hooks/post/pkcs12convert.sh:
#!/bin/sh
openssl pkcs12 -export -out /etc/letsencrypt/live/youramazing.url/youramazing.url.pfx -inkey /etc/letsencrypt/live/youramazing.url/privkey.pem -in /etc/letsencrypt/live/pih.romailler.net/cert.pem -certfile /etc/letsencrypt/live/youramazing.url/chain.pem -passout pass:somepassword
cp /etc/letsencrypt/live/youramazing.url/youramazing.url.pfx /home/user/dns/ssl/
That last copy command is optionnal, obviously, depending on your setup. And so, the issue of having to convert and import the TLS certificate for Technitium DNS is solved. :)
Alas, with my setup, I tweaked some things because I wanted to access the logs from my host and be able to easily provision my SSL certificate to the m400/technitium docker image, and so at first it wouldn’t work well.
I was spammed with the following errors in the logs:
[2021-03-21 22:30:09 UTC] [someip] Check for update was done {updateAvailable: False;}
System.Net.Http.HttpRequestException: The SSL connection could not be established, see inner exception.
 ---> System.Security.Authentication.AuthenticationException: The remote certificate is invalid because of
errors in the certificate chain: PartialChain
   at System.Net.Security.SslStream.SendAuthResetSignal(ProtocolToken message, ExceptionDispatchInfo exception)
   at System.Net.Security.SslStream.ForceAuthenticationAsync[TIOAdapter](TIOAdapter adapter, Boolean receiveFirst, Byte[] reAuthenticationData, Boolean isApm)
   at System.Net.Http.ConnectHelper.EstablishSslConnectionAsyncCore(Boolean async, Stream stream, SslClientAuthenticationOptions sslOptions, CancellationToken cancellationToken)
   --- End of inner exception stack trace ---
but that’s simply because it is lacking a root certificates store, since that is typically in /etc/ssl/certs, but we have mapped in our docker-compose file the whole /etc/ssl folder to a local folder /home/user/dns/ssl instead of letting it live in its own named volume.
So we need to provision it with a copy of our root certificate store:
sudo cp -r /etc/ssl/certs /home/user/dns/ssl/.
Notice how I also followed their doc which said that “creating a docker network with an alias will ensure seamless updates” and added the required network and its alias to my docker-compose file.
So, after some fiddling around, I decided I wanted to try and have a simpler setup, more able to “work out of the box”, and settled with the following docker-compose:
version: '2.4'

services:
	dns_server:
		image: m400/technitium
		networks:
			technitium-network:
				aliases:
					- technitium-dns
		ports:
			- 853:853
			- 53443:53443
		environment:
			- TZ=Europe/Zurich
		volumes:
			- dns-data:/app/config
			- /home/user/dns/ssl/:/etc/letsencrypt/live/youramazing.url/
			- dns-ssl:/etc/ssl
			- dns-logs:/app/config/logs
		restart: unless-stopped

volumes:
	dns-data:
	dns-ssl:
	dns-logs:

networks:
  technitium-network:
I kept using a different folder on my host for my PKCS#12 certificate file, since it’s encrypted and I didn’t want to share the Letsencrypt folder on my host with a container. But used volumes for the rest, because Technitium DNS allows you to manage your log files directly from the Web interface. Since I had meanwhile configured HTTPS access to my Web interface, see below for the details, I also stopped exposing the HTTP port 5380.
Here, some of the “tricky” details that you should double check are that:
- you really need to expose the port 853 on your host and forward it to the Technitium DNS server, since its the standard port for DoT.
- you really need to provide a valid DNS name and valid TLS certificate (but the free Letsencrypt certificates are fine) to Technitium DNS server.
- you need to ensure that upon renewal of your TLS certificate, it will be automatically converted into the proper format for Technitium DNS and provided to the Technitium DNS server.
As you can see I didn’t need to handle exposing the port 80 or 443, because it is sinkholing the ads by sending them to 0.0.0.0 instead of sending them to a dedicated no-op page like PiHole.
I believe that this method is sometimes less effective than PiHole because we will get from times to times big squares with the “failed connection” logo instead of having a fully empty ad:

Nonetheless it works and allows for a pretty simple setup, with just a few ports exposed. I guess I can live with that, especially if it’s stable!
Configuring Technitium DNS server
Next, we simply need to configure Technitium DNS server, but that’s fairly easy too. First, make sure you’ve exposed the port 5380 for your initial setup phase. And then access http://youramazing.url:5380/ with your favourite web browser. You should be greeted with the following:
You can login using default the username ‘admin’ and password ‘admin’. Don’t forget to change the default passowrd and replace it with a strong password.
(Tip: if you are using gopass, you can simply run: gopass generate -c technitium-dns 24 and paste the newly generated password in the required fields of your web browser.)
In its “Settings” tab, Technitium DNS has all the options you need to care about:
-
DNS Server domain: set it to your desired primary domain for the server, the one for which you’ve got certbot running and configured as above. E.g. youramazing.url
-
HTTPS Options: check “Enable HTTPS”, since we have a TLS certificate
-
TLS Certificate File Path: this is an important setting, the path will depend on your setup and how you are provisionning the Letsencrypt certificate converted into PKCS#12 format, but in my setup it’s simply
/etc/letsencrypt/live/youramazing.url/youramazing.url.pfx -
TLS Certificate Password: in my above example I set the password
somepasswordfor our certificate in.pfx, so we need to provide it here too. -
Optional DNS Server Protocols: this is an important setting to set in our example since we want to answer DoT requests. So check the “Enable DNS-over-TLS”
-
Recursive Resolver: here you can uncheck the “Allow Recursion Only For Private Networks” and make sure to have the “Allow Recursion” and “QNAME Minimization” option checked.
Notice that allowing recursion is not an issue with our setup, even if we are exposing our server on the internet, because it’s only exposing port 853 and only does DoT resolution, not regular DNS requests on port 53, and thus shouldn’t allow for the same kind of "DNS Amplification attacks" to DDoS servers on the internet using your server as an amplifier, because of the significant overhead caused by the DoT protocol which nullifies the amplification factor.
-
Block List URLs: this is an important setting if we want to achieve our goal of blocking ads. I decided to use many lists, to make sure to enjoy a nice, ad-free experience:
https://raw.githubusercontent.com/StevenBlack/hosts/master/hosts https://s3.amazonaws.com/lists.disconnect.me/simple_tracking.txt https://s3.amazonaws.com/lists.disconnect.me/simple_ad.txt https://adaway.org/hosts.txt https://v.firebog.net/hosts/AdguardDNS.txt https://v.firebog.net/hosts/Admiral.txt -
Forwarders: this is the server it will query when trying to resolve DNS queries. I decided to use DNS-over-TLS here too, to prevent my ISP from seeing any of my DNS queries:
  dns.google (8.8.8.8:853)
  dns.google (8.8.4.4:853)
  cloudflare-dns.com (1.1.1.1:853)
  cloudflare-dns.com (1.0.0.1:853)
  dns.google ([2001:4860:4860::8888]:853)
  dns.google ([2001:4860:4860::8844]:853)
  cloudflare-dns.com ([2606:4700:4700::1111]:853)
  cloudflare-dns.com ([2606:4700:4700::1001]:853)
Et voilà ! Don’t forget to save your changes, you can also restart your server by running a quick docker-compose down && docker-compose up -d, as I’ve noticed some changes aren’t applied without first rebooting the DNS container.
You can also remove the HTTP port 5380 from the exposed port as we can now log on the web interface using the much safer HTTPS protocol using https://youramazing.url:53443
Phone setup
You now just need to configure the DNS server on your Android device: You can use the built-in DHCP server to assign IP addresses and the DNS servers automatically on your local network. To do so, go to your settings, go to the “Connections” settings, clic on “More connection settings” and add your server URL to the “Private DNS” option.
On any Android 9+ phone, you need to: 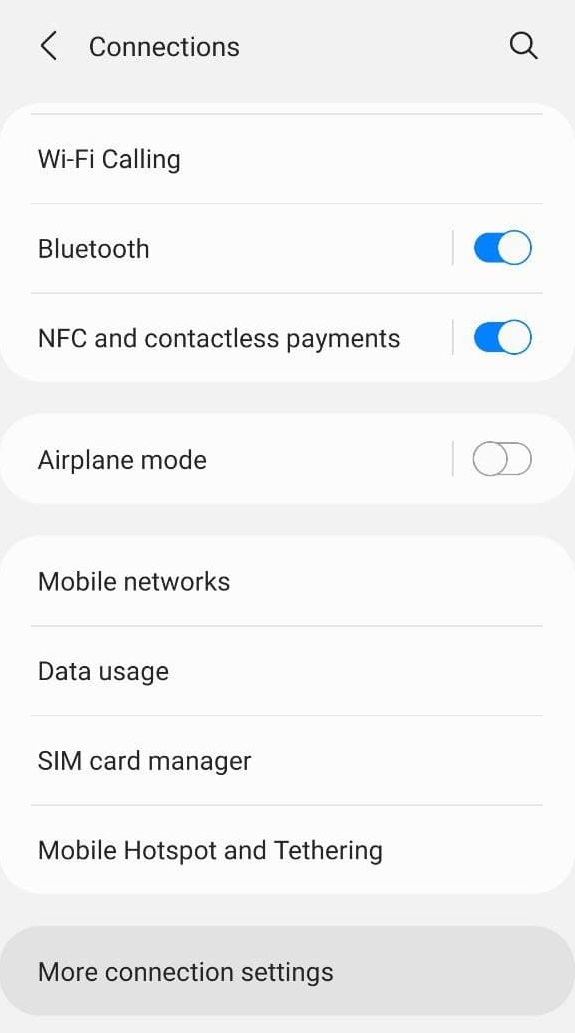 Locate the 'More connection settings' button |
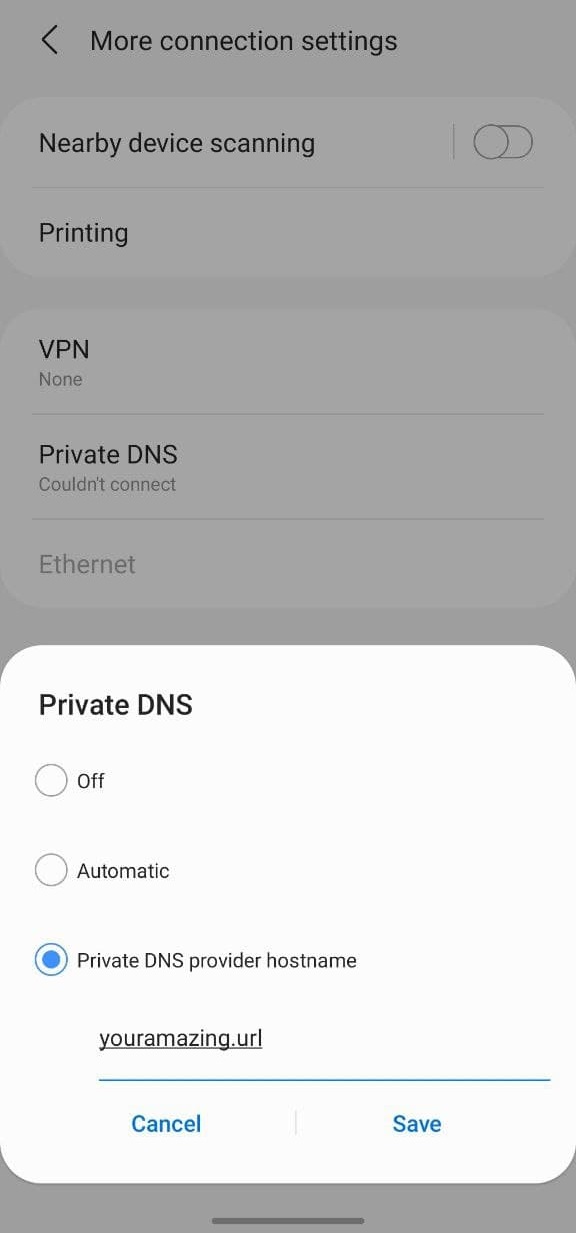 Add your DNS server as a 'Private DNS' |
|---|
No need to specify any port, this Private DNS setting only works using DoT on port 853.
This sadly doesn’t work on iPhones for now.
Enjoy
Now you can enjoy an ad-free Android experience!
This even works for ads in some apps, but it won’t block the Youtube ads, I’m afraid. It also won’t block “Sponsored content” that are not coming through an ad-network.
Here’s a little gallery of examples:
| Before | After |
|---|---|
 |
 |
 |
 |
 |
 |
And the best thing is that it is working for both the Wifi and the 4G/LTE networks!
You can also use the nice dashboard to see how many requests were blocked, or processed:
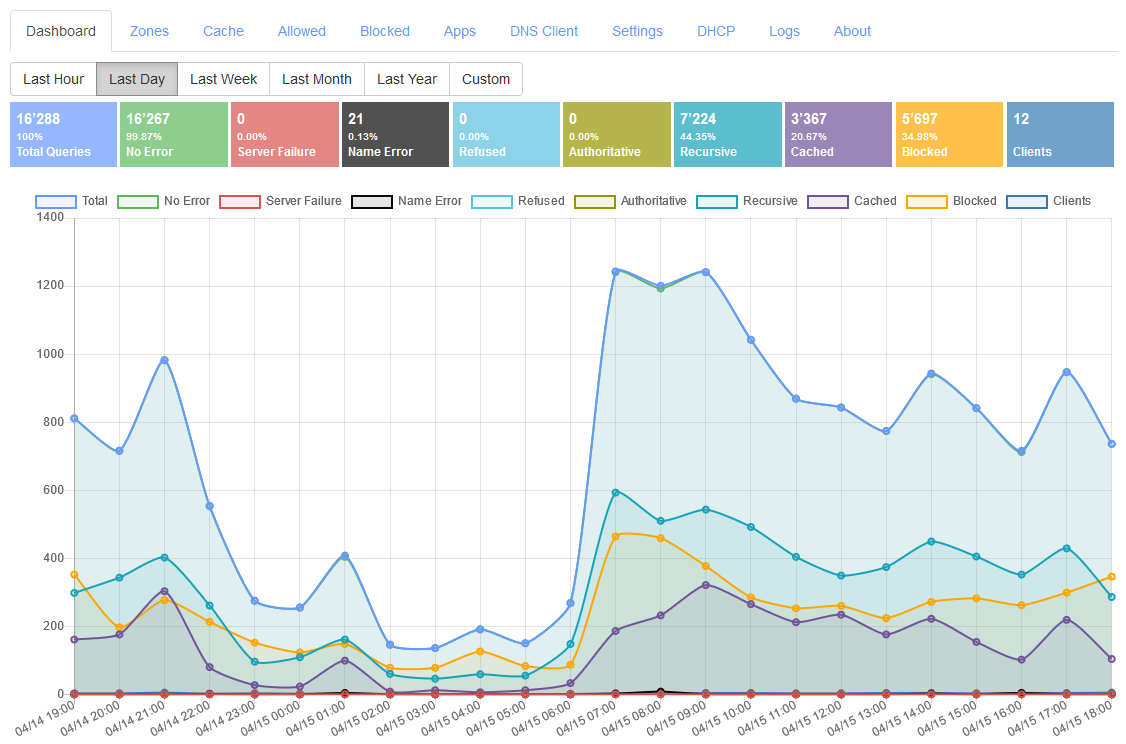
Technitium's dashboard showing us the last day stats in its Web interface
The End
This was an interesting adventure, playing around with Docker, Docker-compose, Nginx-proxy, Letsencrypt, PiHole, Unbound and it tooks me a few days of fiddling around before being able to come up with such a simple, yet fully working solution.
I hope you’ll try it too, because my Android experience really improved now that I can get rid of ads on both Wifi and 4G/LTE networks.
Post-Scriptum
For the sake of completeness, let me mention here that there are “free”, “public”, “ad-blocking” DoT servers which you can use right now if you want. On my side, I wanted to go through the exercice of setting up the ad-blocking and the DoT server on my own. So in case you “just want to enjoy an ad-free experience on Android without doing anything”, you setup one of the following servers on your phones just like in the setup above:
These servers are blocking ads, tracking and phishing:
- dns.adguard.com
- dns.comss.one
- dns.east.comss.one
- dot-fi.blahdns.com
- dot-jp.blahdns.com
- dot-de.blahdns.com
- dnsforge.de
These servers are blocking adult or explicit websites (the first two also block ads and the DNSforFamily one also blocks malware and such):
- dns-family.adguard.com
- dns-dot.dnsforfamily.com
- family-filter-dns.cleanbrowsing.org
These servers aren’t blocking ads but are running a privacy-friendly DoT server with no logging (in theory 😉) to prevent your ISP from seeing your DNS requests:
- unicast.censurfridns.dk
- ns1.dnsprivacy.at
- dot.seby.io
- dns-unfiltered.adguard.com
- dns.quad9.net
- dot.tiar.app
- dns.decloudus.com